1、旋转编码器 #
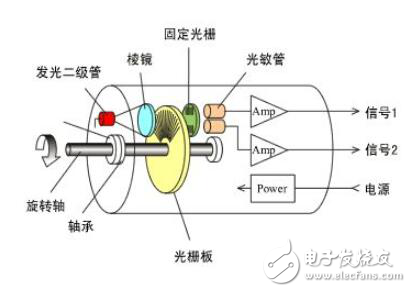
旋转编码器是一种机电装置,它是集光机电技术于一体的速度位移传感器。可将轴转动转化为模拟或数字代码。
旋转编码器主要有两种类型:绝对式旋转编码器和相对式旋转编码器(也叫增量式旋转编码器),绝对式旋转编码器的输出指示轴当前旋转位置,通常用来作为角度传感器;相对式旋转编码器的输出提供关于轴运动的信息,相对角度变化量。本课程使用增量式旋转编码器。
当旋转编码器轴带动光栅盘旋转时,经发光元件发出的光被光栅盘狭缝切割成断续光线,并被接收元件接收产生初始信号。该信号经后继电路处理后,输出脉冲或代码信号。
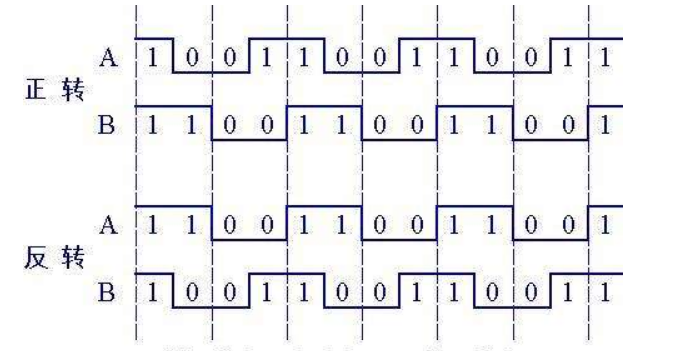
增量式/相对式旋转编码器正反转波形图如下,通过A波形下降沿同一时刻,检测B波形状态,即可感知旋钮式正传还是反转,如果B波形高电平则正转,B波形低电平则旋钮反转。
其特点是体积小,重量轻,品种多,功能全,频响高,分辨能力高,力矩小,耗能低,性能稳定,可靠使用寿命长等特点。编码器在各类仪器设备中用于频率、音量、速度、温度、电压、菜单选择、光线强弱等参数的控制。器主要用于车载DVD、车载导航、汽车影音等汽车电子、多媒体音响、仪器仪表、家用电器、智能家居、计算机周边、医疗器械等领域。主要用于频率调节、亮度调节、温度调节、音量调节的参数控制等。
2、串口绘图器 #
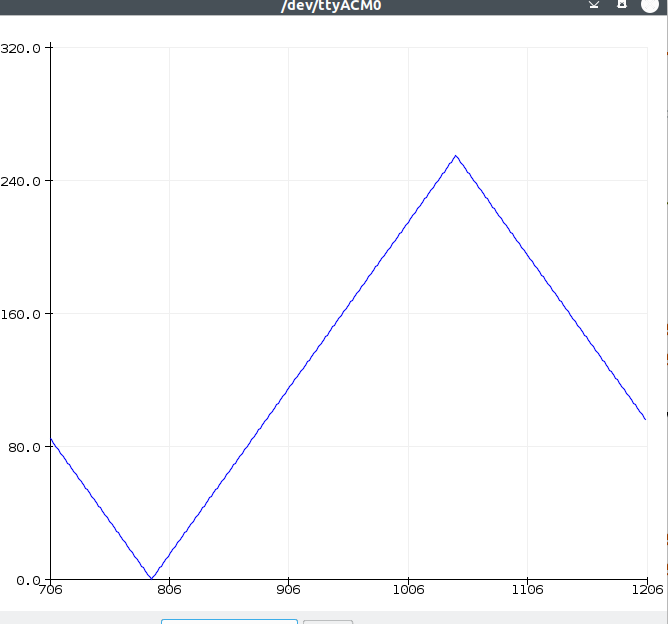
Arduino IDE自带绘图工具,用于观测制定引脚输出数据变化。将第02课 双色LED灯最后一个实验代码“实验2、实现红绿渐变色”运行观察串口监视器图形变化。
const int RedPin = 9;
const int GreenPin = 10;
int val=0;

void setup()
{
  pinMode(RedPin, OUTPUT); //set redPin as OUTPUT
  pinMode(GreenPin, OUTPUT);//set greenPin as OUTPUT
  Serial.begin(9600);
}
/******************************************************/
void loop()
{
  for(val=255; val>0; val--) //
  {
   analogWrite(RedPin, val); //red value decrease
   analogWrite(GreenPin, 255-val);//green value increase
   Serial.println(val, DEC);//print the val on in serial monitor
   delay(30); //delay 30ms
  }
for(val=0; val<255; val++)
  {
   analogWrite(RedPin, val); //red value increase
   analogWrite(GreenPin, 255-val);//green value decrease
   Serial.println(val, DEC);//print the val on in serial monitor
   delay(30); //delay 30ms
  }
}
3、所需元件清单 #
Arduino Uno主板
USB数据线
相对式旋转编码器
面包板
9V电池
杜邦导线
4、动手实验 #
实验1、编写程序用来观察旋转编码器DT、CLK波形
A实验接线
VCC—5v
GND—GND
clk-—2
dt-—3
sw—4
B实验代码
const int clkPin= 2; //the clk attach to pin2
const int dtPin= 3; //the dt attach to pin3

void setup() {
  // put your setup code here, to run once:
  pinMode(clkPin, INPUT);
  pinMode(dtPin, INPUT);
  Serial.begin(9600);
}

void loop() {
  // put your main code here, to run repeatedly:
Serial.println(digitalRead(clkPin));
Serial.println(digitalRead(dtPin));
}
实验2、编写代码实现旋转编码器计数
实验代码
const int clkPin= 2; //the clk attach to pin2
const int dtPin= 3; //the dt attach to pin3
const int swPin= 4 ;//the number of the button

int encoderVal = 0;

void setup()
{
  //set clkPin,dePin,swPin as INPUT
  pinMode(clkPin, INPUT);
  pinMode(dtPin, INPUT);
  pinMode(swPin, INPUT);
  digitalWrite(swPin, HIGH);
  Serial.begin(9600); // initialize serial communications at 9600 bps

}

void loop()
{
  int change = getEncoderTurn();//
  encoderVal = encoderVal + change;
  if(digitalRead(swPin) == LOW)//if button pull down
  {
    encoderVal = 0;
  }
  Serial.println(encoderVal);
}

int getEncoderTurn(void)
{
  static int oldA = HIGH; //set the oldA as HIGH
  static int oldB = HIGH; //set the oldB as HIGH
  int result = 0;
  int newA = digitalRead(dtPin);//read the value of clkPin to newA
  int newB = digitalRead(clkPin);//read the value of dtPin to newB
  if (newA != oldA || newB != oldB) //if the value of clkPin or the dtPin has changed
  {
    // something has changed
    if (oldA == HIGH && newA == LOW)
    {
      result = (oldB * 2 - 1);
    }
  }
  oldA = newA;
  oldB = newB;
  return result;
}


